3. 开通直通模式
在本章节,将会介绍如何在钉钉魔法棒·AI生产力平台创建一个AI助理,并开通直通模式。包括以下内容:
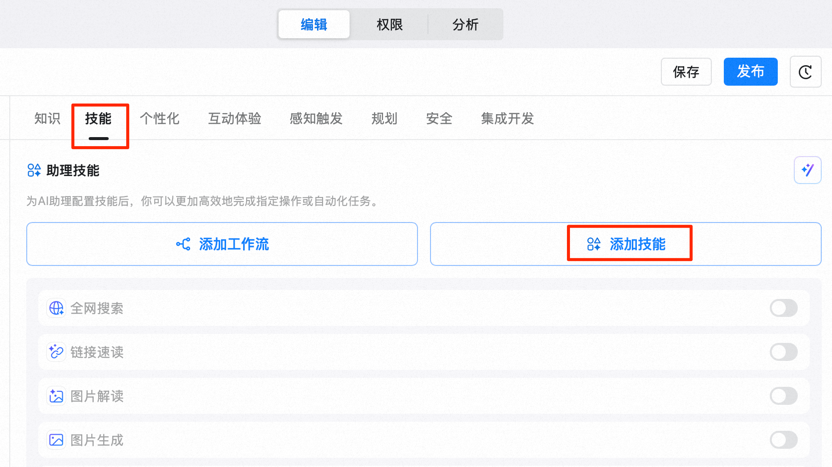
- 创建AI助理的自定义能力
- 编写接口的 Yaml 描述文件
- 确认 AI 助理仅包含一个自定义接口
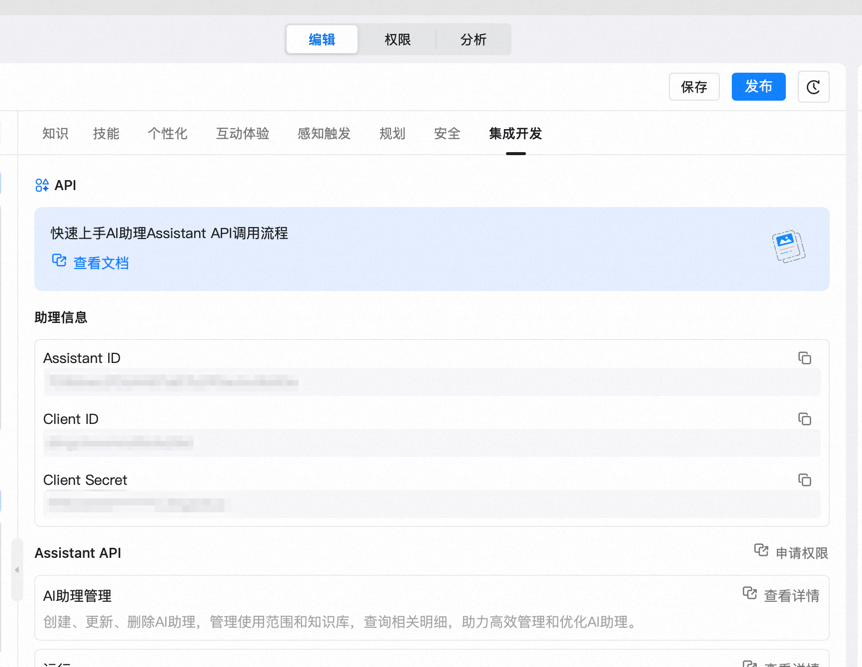
- 获取 AI 助理(应用)凭证,即 Client ID 和 Client Secret
步骤一: 创建自定义能力


步骤二: 编写接口的 Yaml 描述文件,我们这里以天气查询为例
注意事项
- 使用直通模式,所有的参数都必须且只能附带 x-dingtalk-context 属性来从上下文中获取,不能含有需要大模型提取的参数。
- AI 助理下面只能定义一个描述文件且只能定义一个接口。
- 关闭或删除智能对话技能(以及助理下其他开启的技能)
以下有多种请求配置方式供参考,可以选择一个适合自己的方式来参考使用。
- GET请求格式(Stream协议)
- POST请求格式(Stream协议)
- GET请求格式(HTTP协议)
- POST请求格式(HTTP协议)
openapi: 3.0.1
info:
  title: 天气查询
  description: 按地区和日期来查看天气信息,了解气温、湿度、风向等信息。非真实天气数据,仅用于演示,请勿在生产中使用。
  version: v1.0.0
x-dingtalk-protocol: stream
paths:
  /v1/actions/example/weather/get:
    get:
      description: 查询特定地区的天气信息
      summary: 查看天气
      operationId: GetCurrentWeather
      parameters:
        - name: input
          in: query
          description: 输入信息
          required: true
          schema:
            type: string
            x-dingtalk-context:
              property: currentInput
              format: raw
        - name: sender
          in: query
          description: 请求人
          required: true
          schema:
            type: string
            x-dingtalk-context:
              property: currentUser
              format: userId
        - name: inputAttribute
          in: query
          description: 输入信息属性
          required: true
          schema:
            type: string
            x-dingtalk-context:
              property: currentInput
              format: attribute
        - name: corpId
          in: query
          description: 组织信息
          required: true
          schema:
            type: string
            x-dingtalk-context:
              property: currentOrg
              format: corpId
      responses:
        '200':
          description: OK
          content:
            application/json:
              schema:
                $ref: '#/components/schemas/GetWeatherResponse'
components:
  schemas:
    GetWeatherResponse:
      type: object
      properties:
        location:
          type: string
          description: 查询天气结果对应的城市和地区
        date:
          type: string
          description: 查询天气结果对应的日期
        text:
          type: string
          description: 天气现象,晴天、多云等
        temperature:
          type: number
          description: 气温,单位:摄氏度
        humidity:
          type: number
          description: 湿度
        wind_direction:
          type: string
          description: 风向
openapi: 3.0.1
info:
  title: 天气查询
  description: 按地区和日期来查看天气信息,了解气温、湿度、风向等信息。非真实天气数据,仅用于演示,请勿在生产中使用。
  version: v1.0.0
## 推荐使用钉钉 Stream 模式,无需提供公网域名(https://open.dingtalk.com/document/ai-dev/actions-advanced-settings#dc65a46ae9nis)
x-dingtalk-protocol: stream
paths:
  /v1/actions/example/weather/get:
    post:
      description: 查询特定地区的天气信息
      summary: 查看天气
      operationId: GetCurrentWeather
      requestBody:
        content:
          application/json:
            schema:
              type: object
              properties:
                input:
                  type: string
                  description: 输入信息
                  x-dingtalk-context:
                    property: currentInput
                    format: raw
                attribute:
                  type: string
                  description: 输入属性
                  x-dingtalk-context :
                    property: currentInput
                    format: attribute
                sender:
                  type: string
                  description: 发送人UserId
                  x-dingtalk-context:
                    property: currentUser
                    format: userId
                corpId:
                  type: string
                  description: 组织信息
                  x-dingtalk-context:
                    property: currentOrg
                    format: corpId
      parameters:
        - name: input
          in: query
          description: 输入信息
          required: true
          schema:
            type: string
            x-dingtalk-context:
              property: currentInput
              format: raw
        - name: sender
          in: query
          description: 请求人
          required: true
          schema:
            type: string
            x-dingtalk-context:
              property: currentUser
              format: userId
      responses:
        '200':
          description: OK
          content:
            application/json:
              schema:
                $ref: '#/components/schemas/GetWeatherResponse'
components:
  schemas:
    GetWeatherResponse:
      type: object
      properties:
        location:
          type: string
          description: 查询天气结果对应的城市和地区
        date:
          type: string
          description: 查询天气结果对应的日期
        text:
          type: string
          description: 天气现象,晴天、多云等
        temperature:
          type: number
          description: 气温,单位:摄氏度
        humidity:
          type: number
          description: 湿度
        wind_direction:
          type: string
          description: 风向
openapi: 3.0.1
info:
  title: 天气查询
  description: 按地区和日期来查看天气信息,了解气温、湿度、风向等信息。非真实天气数据,仅用于演示,请勿在生产中使用。
  version: v1.0.0
servers:
  - url: https://action-example.dingtalk.com
paths:
  /v1/actions/example/weather/get:
    get:
      description: 查询特定地区的天气信息
      summary: 查看天气
      operationId: GetCurrentWeather
      parameters:
        - name: input
          in: query
          description: 输入信息
          required: true
          schema:
            type: string
            x-dingtalk-context:
              property: currentInput
              format: raw
        - name: sender
          in: query
          description: 请求人
          required: true
          schema:
            type: string
            x-dingtalk-context:
              property: currentUser
              format: userId
        - name: inputAttribute
          in: query
          description: 输入信息属性
          required: true
          schema:
            type: string
            x-dingtalk-context:
              property: currentInput
              format: attribute
        - name: corpId
          in: query
          description: 组织信息
          required: true
          schema:
            type: string
            x-dingtalk-context:
              property: currentOrg
              format: corpId
      responses:
        '200':
          description: OK
          content:
            application/json:
              schema:
                $ref: '#/components/schemas/GetWeatherResponse'
components:
  schemas:
    GetWeatherResponse:
      type: object
      properties:
        location:
          type: string
          description: 查询天气结果对应的城市和地区
        date:
          type: string
          description: 查询天气结果对应的日期
        text:
          type: string
          description: 天气现象,晴天、多云等
        temperature:
          type: number
          description: 气温,单位:摄氏度
        humidity:
          type: number
          description: 湿度
        wind_direction:
          type: string
          description: 风向
openapi: 3.0.1
info:
  title: 天气查询
  description: 按地区和日期来查看天气信息,了解气温、湿度、风向等信息。非真实天气数据,仅用于演示,请勿在生产中使用。
  version: v1.0.0
servers:
  - url: https://action-example.dingtalk.com
paths:
  /v1/actions/example/weather/get:
    post:
      description: 查询特定地区的天气信息
      summary: 查看天气
      operationId: GetCurrentWeather
      requestBody:
        content:
          application/json:
            schema:
              type: object
              properties:
                input:
                  type: string
                  description: 输入信息
                  x-dingtalk-context:
                    property: currentInput
                    format: raw
                attribute:
                  type: string
                  description: 输入属性
                  x-dingtalk-context :
                    property: currentInput
                    format: attribute
                sender:
                  type: string
                  description: 发送人UserId
                  x-dingtalk-context:
                    property: currentUser
                    format: userId
                corpId:
                  type: string
                  description: 组织信息
                  x-dingtalk-context:
                    property: currentOrg
                    format: corpId
      parameters:
        - name: input
          in: query
          description: 输入信息
          required: true
          schema:
            type: string
            x-dingtalk-context:
              property: currentInput
              format: raw
        - name: sender
          in: query
          description: 请求人
          required: true
          schema:
            type: string
            x-dingtalk-context:
              property: currentUser
              format: userId
      responses:
        '200':
          description: OK
          content:
            application/json:
              schema:
                $ref: '#/components/schemas/GetWeatherResponse'
components:
  schemas:
    GetWeatherResponse:
      type: object
      properties:
        location:
          type: string
          description: 查询天气结果对应的城市和地区
        date:
          type: string
          description: 查询天气结果对应的日期
        text:
          type: string
          description: 天气现象,晴天、多云等
        temperature:
          type: number
          description: 气温,单位:摄氏度
        humidity:
          type: number
          description: 湿度
        wind_direction:
          type: string
          description: 风向
步骤三: 确认 AI 助理仅包含一个自定义接口
必须确认当前 AI 助理没有关联其他任何技能,才可以成功开通直通模式,否则钉钉 AI 助理无法确定请求转发到哪一个接口。
- 如果 yaml 中有多个接口,请修改为一个
- 如果 AI 助理中开启了多个技能,请关闭其他技能,仅保留着一个用于直通的自定义技能
步骤四: 获取 AI 助理(应用)凭证
此处需要获取 AI 助理(应用)凭证,即 Client ID 和 Client Secret,用于后续的代码开发。
在助理编辑页面,点击「集成开发」选项卡,可以从中可以获取 Client ID 和 Client Secret,以及助理 ID 等信息。
